
Introducing the latest article in our Data Deep Dive series: An introduction to Microsoft Azure Functions for Workflow Deployment and Automation
Written by NICD Data Scientists Dr Antonia Kontaratou, and Louise Braithwaite
Introduction
Introduction to key concepts
In both projects, our clients selected Microsoft Azure as their cloud provider, leading us to use Azure Services for deployment. The key technical components used in the Azure ecosystem for these deployments included Azure Functions, as well as queues and containers within an Azure Storage Account. This section provides an overview of these components to establish a foundational understanding before providing more details about how to set up the required resources in the cloud and giving examples.
Azure Functions
Azure Functions is a serverless compute service provided by Microsoft Azure. In a serverless model, developers can build and run applications without managing the underlying infrastructure. Azure Functions enables users to execute small pieces of code (functions) in response to various events, such as HTTP requests, scheduled triggers, database changes and file uploads. Because it is serverless, Azure automatically scales resources based on demand, ensuring efficient performance without manual intervention. This abstraction simplifies application development by allowing developers to focus on the business logic rather than handling server maintenance or scaling.
Azure Storage account: containers and queues
Azure Storage Accounts provide cloud-based storage solutions, supporting multiple types of data storage, including Blob Storage and Queue Storage. Two essential components within a storage account are containers (for Blob Storage) and queues (for Queue Storage), each serving a distinct purpose in cloud applications.
Containers (Blob Storage): A container is a logical unit within Azure Blob Storage that organises and manages blobs (Binary Large Objects). Similar to folders in a file system, containers store and structure individual files, enabling efficient access and organisation of structured and unstructured data.
Queues (Queue Storage): Azure Queue Storage provides a messaging system for asynchronous communication between application components. Messages placed in a queue can be processed by services or workers. Once a worker retrieves and processes a message, it is removed from the queue. If processing fails, the message can remain in the queue or be moved to a poison queue for later review and troubleshooting.
Setting up the cloud resources using the Azure portal
Before deploying our solution, we first need to provision the cloud resources that will host and support it. While some Azure resources can be created through infrastructure-as-code or command-line tools, we use the Azure portal to configure the core services required for our deployment. The primary resource we need to create is the Function App, which provides the execution environment for our application logic.
Selecting the Consumption Plan for this resource provides a pay-as-you-go model, where a user only pays for compute resources when their functions are actively running. This plan is a great starting point unless the project has specific performance or scaling requirements.
During the Function App creation in the Azure portal, users must configure several parameters, including the resource group, runtime environment (Python, in our case), and runtime version (Python 3.13 is the latest stable version at the time of writing). Other configurations include storage settings, monitoring options and deployment preferences.
Once the Function App is deployed, Azure automatically creates four key resources:
-
Azure Functions App – The core service where the functions we develop are deployed, managed and monitored.
-
Storage Account – Stores containers and queues required for our solution and hosts essential files for remote deployment. If the storage account has not been created automatically it will have to be created separately within the resource group.
-
Application Insights – Provides monitoring, logging and performance tracking for the function app.
-
App Service Plan (if applicable) – Determines the hosting model, including scaling, pricing and infrastructure management (applies if a plan other than Consumption is chosen).
You can see the resources created for this demo in our resource group in Figure 1.

Figure 1. Created resources associated to Azure Functions
With these resources in place, we can proceed with deploying and managing our Azure Functions efficiently.
Example of an end-to-end pipeline
When working with Azure Functions we use the v2 Python programming model, the current recommended approach for Python-based function development. This model uses decorators to define triggers and bindings directly in code. When a new Azure Functions project is created, a function_app.py is generated. This script serves as the central entry point for the application, where functions are defined, configured and registered with the Function App.
For this example we will focus on developing a very simple ‘Customer order status retrieval system’ which accepts an order id, checks the order status and logs it. To implement this pipeline we use three Azure Functions with three different types of triggers: HTTP, queue and blob. An HTTP-triggered function runs in response to an HTTP request, such as a user opening a URL in a browser or an application making an API call, and returns a HTTP response. A queue triggered function runs automatically when a new message is added to an Azure Storage Queue, allowing for asynchronous processing of tasks. Finally, a blob triggered function runs automatically whenever a new file (blob) is added, modified or deleted in Azure Blob Storage, enabling event-driven processing of files.
The three functions are the following:
-
order_status_request- HTTP Trigger: Accepts a GET request with anorder_idand adds it to a queue -
process_order_status- Queue Trigger: Reads from the queue, simulates order processing and writes the order status to Blob Storage. -
log_order_status_update- Blob Trigger: Detects new status updates in Blob Storage and logs the update.
Before writing the functions themselves, we need to import the required libraries, initialise our Function App, and set up our configuration variables. This setup goes at the very top of your function_app.py file:
Initialisation of Function App
import os
import json
import base64
import logging
import azure.functions as func
from azure.storage.queue import QueueServiceClient
from azure.storage.blob import BlobServiceClient


app = func.FunctionApp()

# Retrieve the storage connection string from environment variables (local.settings.json)
CONNECTION_STRING = os.environ.get("STORAGE_CONNECTION_STRING")

# Define resource names
ORDER_QUEUE_NAME = "order-queue"
ORDER_CONTAINER_NAME = "order-status"
Let’s write the code of these functions and explain each one of them.
Function 1: order_status_request - HTTP Trigger
### Function 1. HTTP Trigger: Accepts order status request ###
# It is a GET request, accessible at /api/order-status?order_id=<id>
# e.g. run from your browser: http://localhost:7071/api/order-status?order_id=125
@app.function_name(name="order_status_request")
@app.route(route="order-status")
def order_status_request(req: func.HttpRequest) -> func.HttpResponse:
    logging.info("Received an order status request.")

    # Get order_id from query parameters of the URL
    order_id = req.params.get("order_id")
    if not order_id:
        return func.HttpResponse("Please provide an order_id.", status_code=400)

    # Send the order_id to Azure Queue Storage
    queue_service = QueueServiceClient.from_connection_string(CONNECTION_STRING)
    queue_client = queue_service.get_queue_client(queue=ORDER_QUEUE_NAME)

    # Prepare the message to be added in the queue after encoding it
    msg = order_id
    encoded_msg = base64.b64encode(msg.encode('utf-8')).decode('utf-8')
    logging.info(f"Message/order id to be added to the queue: {msg}")
    queue_client.send_message(encoded_msg)

    return func.HttpResponse(
        json.dumps({"message": f"Your request has been received. Order ID: {order_id}"}),
        mimetype="application/json",
        status_code=200,
    )
This function acts as the entry point to our order status retrieval system. It is triggered by a GET request made to the /api/order-status endpoint, with the order_id passed as a query parameter. For example, to run it locally we could type: http://localhost:7071/api/order-status?order_id=125 in our browser.
When the function receives the request, it first checks whether an order_id has been provided. If not, it returns a 400 error response asking the user to include one. If a valid order_id is found, the function proceeds to prepare the order number and sends it as a message to an Azure Storage Queue. The message is Base64-encoded, as required by Azure Queue Storage.
This setup allows the system to decouple the request from the processing logic, letting a background worker pick up the message from the queue and handle the order status check asynchronously. The function ends by sending a confirmation response back to the requester, letting them know that their order ID has been received and queued for processing.
When this function is executed properly you can see the following in your browser:
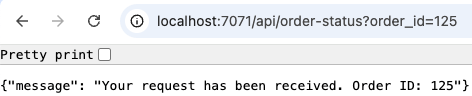
Figure 2. Successful run of Function 1
Function 2: process_order_status - Queue Trigger
After having successfully received the order id and added it in the queue, we can read it from the queue in the next function and retrieve the order’s status.
### Function 2. Queue Trigger: Processes order status request ###
@app.queue_trigger(arg_name="msg", queue_name="order-queue", connection="STORAGE_CONNECTION_STRING")
def process_order_status(msg: func.QueueMessage):
    logging.info("Processing order status request.")

    # Get and decode the message/order id from the queue
    raw_message_body = msg.get_body()
    order_id = raw_message_body.decode('utf-8')

    # Simulate acquiring order status
    order_status = "Shipped"  # This could be retrieved dynamically from a database

    # Save status update to Blob Storage
    blob_service_client = BlobServiceClient.from_connection_string(CONNECTION_STRING)
    blob_client = blob_service_client.get_blob_client(container=ORDER_CONTAINER_NAME, blob=f"{order_id}.json")

    order_status_data = {"order_id": order_id, "status": order_status}
    blob_client.upload_blob(json.dumps(order_status_data), overwrite=True)

    logging.info(f"Order {order_id} status processed and stored in Blob Storage.")
This function is triggered automatically whenever a new message is added to the Azure Storage Queue named ‘order-queue’. The message, which contains the order_id, is placed in the queue by the previously described HTTP-triggered function.
Once triggered, the function decodes the message to extract the order_id, simulates looking up the status of that order (here we simply return “Shipped”) and then creates a JSON object with the order ID and status.
Finally, it saves this information into Azure Blob Storage under a filename like 125.json. This setup demonstrates how Azure Functions can work together asynchronously — the HTTP request hands off work to a queue and the queue-triggered function does the heavy lifting of processing and storage.
Having successfully run this function will result in having a new file (125.json) with information for the status of this order ({“order_id”: “125”, “status”: “Shipped”}) in the relevant container (‘order-status’) in our storage account, as shown in Figure 3.
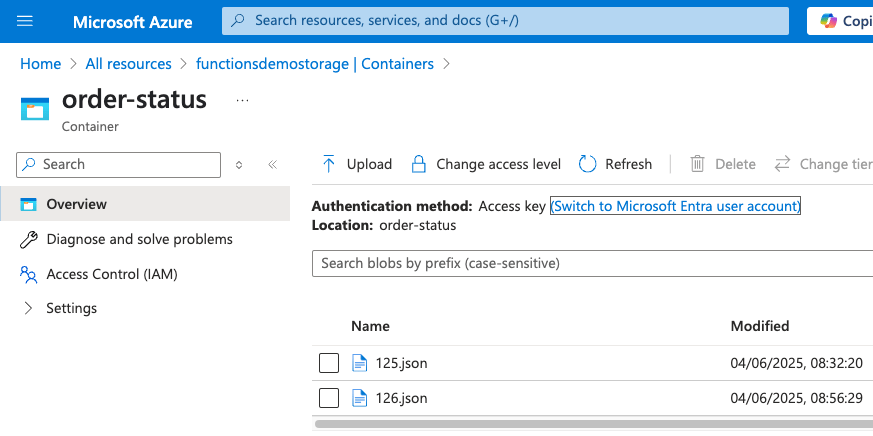
Figure 3. Successful run of Function 2 - Container update
Function 3: log_order_status_update - Blob Trigger
A final function closes the process by reacting to changes in Blob Storage and logging that the order status has been successfully recorded.
### Function 3. Blob Trigger: Logs new order status updates ###
@app.function_name(name="log_order_status_update")
@app.blob_trigger(arg_name="myblob", path="order-status/{name}", connection="STORAGE_CONNECTION_STRING")
def log_order_status_update(myblob: func.InputStream):
    logging.info(f"New order status update detected in Blob Storage: {myblob.name}")

    # Read blob content and log the order status
    order_status_data = json.loads(myblob.read().decode("utf-8"))
    logging.info(f"Order {order_status_data['order_id']} is now {order_status_data['status']}.")
This function is automatically triggered whenever a new file is added to the order-status container in Azure Blob Storage. As mentioned above, these files are created by the queue-triggered function and contain JSON data with the order ID and its current status.
When a new blob is detected, this function reads its contents, parses the JSON, and logs a message with information extracted from the JSON file, for example: ‘Order 125 is now Shipped.’
Summary
In this blog post, we shared some information on how to step into deployment using Microsoft Azure to bridge the gap between experimentation and production.
Drawing from recent projects, we introduced the core Azure services relevant to deploying data science solutions, focusing on Azure Functions and Azure Storage. We provided a simple, end-to-end example using HTTP, queue and blob-triggered functions to demonstrate how serverless components can be orchestrated into a working pipeline.
For readers who want to try this out themselves, we also include in the following section, an optional hands-on guide for setting up the environment in Azure, running code locally in VS Code and deploying the solution to the cloud.
DIY Dev: Setting up Azure Functions with VS Code
Now that you have an understanding of Azure Functions, you might want to develop your own code, run it locally, deploy it to Azure and test its execution. This section provides instructions on how to do so. It requires setting up the necessary environment, starting the storage emulator (Azurite) and executing functions within VS Code. It also involves publishing the function app to the cloud and ensuring all dependencies are correctly configured.
Setting up Azure Functions with VS Code
- Install VS Code and Azure Functions Prerequisites
-
-
Follow the official Azure Functions setup guide for configuring Azure Functions with VS Code using the v2 programming model.
-
If you don’t have VS Code, install it first.
-
Ensure you install the required Azure Functions extension, Azure Functions Core Tools, and other prerequisites.
-
- Set Up Python with pyenv
-
-
Install pyenv (or another Python version manager) to manage Python versions consistently. If you’re on macOS, follow the installation guide.
-
Install a Python version that is currently supported by your target Azure Functions runtime (refer to the official Azure Functions language support matrix).
-
Set that version for your project and verify it:
python --version
-
- Create and Activate a Virtual Environment
-
From your project directory, create a virtual environment using the active Python interpreter:
python -m venv .venv -
Activate the virtual environment
source .venv/bin/activate -
Install project dependencies:
python -m pip install --upgrade pip
pip install -r requirements.txt- If you do not have a requirements file yet, install the required libraries manually with pip:
python -m pip install --upgrade pip
pip install azure-functions azure-storage-queue azure-storage-blob- Install and Configure Azure CLI
-
-
Ensure you have the Azure CLI installed. Follow the installation guide.
-
If you encounter permission issues on a Mac, check if Homebrew is set up correctly.
-
Once installed, log in to Azure from the command line:
az login -
This will open a browser for authentication.
-
After logging in, go back to the terminal and select the correct Azure subscription (typically the first one).
- The command line commands to list and select a subscription are:
-
az account list --output table
az account set --subscription "<subscription-id-or-name>"- Install Azure Functions Core Tools
-
- The setup guide in Step 1 covers Core Tools installation as part of its prerequisites. If you skipped that step or need a standalone reference, follow the official instructions to install Azure Functions Core Tools directly.
- Install Azurite (local storage emulator)
-
- Install Azurite, an open-source emulator for testing Azure storage locally. Follow the installation guide.
- Sign in to Azure in VS Code
-
-
Open the Azure extension in VS Code and sign in, more information here.
-
You should now see all the resources associated with your Azure account.
-
- Create the local.settings.json File
-
-
This file stores configuration details like keys, endpoints, and connection strings required by your Azure Function.
-
Create a local.settings.json file in your project directory and populate it with the necessary information.
-
Ensure you update the file with the correct details based on the Azure resources you’ve created.
-
Important: Do not commit
local.settings.jsonto source control, as it contains sensitive credentials. Add it to your .gitignore file to prevent accidental exposure.
-
Running Azure Functions locally in VS Code
To run Azure Functions locally in VS Code, follow these steps:
- Start Azurite (Storage Emulator)
-
-
Press F1 in VS Code and search for “Azurite: Start”.
-
This will launch the local storage emulator needed for Azure Functions.
-
- Run the Function App
-
- Open the VS Code terminal and execute:
func start
- Open the VS Code terminal and execute:
- Verify successful execution
-
-
The startup process may take a few moments.
-
Once running, you should see a list of all functions defined in function_app.py displayed in the terminal.
-
Publishing Azure Functions
To deploy your Azure Functions remotely, follow these steps:
- Prepare the requirements.txt File
-
-
Ensure that all required Python libraries are listed in the requirements.txt file.
-
Remove libraries like pytorch, torchvision and psycopg2, as they can cause deployment failures.
-
- Deploy the Function App
-
-
Run the following command to publish your Azure Function, replacing
<name_of_azure_functions>with the name of your Function App as it appears in the Azure portal:func azure functionapp publish <name_of_azure_functions> -
The deployment process will take a few minutes. You can monitor progress in the terminal output.
-
- Verify deployment
-
-
Once deployment is complete, the terminal will display the functions that have been published.
-
If successful, you should see all the functions defined in function_app.py.
-
- Test the Remote Function
-
-
Once deployed, the terminal will display the URL for any HTTP-triggered functions. It will be in the format:
https://<name_of_azure_functions>.azurewebsites.net/api/order-status -
Test the function by opening the URL in your browser with an order_id query parameter, for example:
https://<name_of_azure_functions>.azurewebsites.net/api/order-status?order_id=125 -
You should receive the same JSON response as when running locally. The queue and blob-triggered functions will then execute automatically in sequence, as described in the pipeline example above.
-
- Monitor execution and logs
-
-
To stream live logs from your deployed Function App in the terminal, run:
func azure functionapp logstream <name_of_azure_functions> -
Alternatively, open the Application Insights resource in the Azure portal to view detailed logs, execution history and performance metrics for your functions.
-
You can also verify that the pipeline ran end-to-end by checking the order-status container in your Storage Account in the Azure portal — a new JSON file should appear for each order ID processed.
-
Find out more
The National Innovation Centre for Data is always open to exploring collaboration opportunities. If you have developed a prototype and you would like to explore its deployment in the cloud, please don’t hesitate to reach out to us. We’d be delighted to discuss how we can assist you in your data engineering journey.